Feb 26, 2014

Lark Book: Quilled Name / Lettering "kate"


For those who have followed me from my previous blog, Crafting Creatures, you will have seen one of my most popular quilled items, a namesake piece for a special girl named "jade". I've made a similar project here for a "kate" to explain how I made it. Since I don't know a little kate, I will be selling this item in my Etsy shop.


I list the font and size used in my book, Pretty Quilled Cards, and of course include the patterns to make my open petal style flowers. The letters are raised from the teal-green background to give another plane of depth within the shadow box frame.


Sometimes when dealing with so many colors within a project, it helps to have another opinion. I felt like Goldilocks saying "this is too.. that is too...". The knowledgeable Tonya of Paper Poet helped me finally decide on the Stardream metallic background. If you ever need a selection of metallic papers or envelopes, her store has two walls full of color choices – bonus, she is also a letterpress print shop!

Feb 19, 2014

Lark Book: Quilled Wedding Cake Card


Wedding season is just around the corner, and this quilled wedding cake is the dreamy kind I imagined of having for my wedding day, when I was a girl. My real wedding cake was more grounded, but I have a soft spot for idyllic storybook versions.


Books simply don't have enough pages to show every angle of every card, so I'm going to show a couple close ups here. Throughout the 128 pages and 26 projects, I tried to incorporate as many new ways of using quilling strips as I could. See the ornate table surface? Can you believe that was a happy accident? I needed to ensure my table top and bottom strips were straight and even, so I made a spacer. I finally realized the spacer made a wonderful accent to the card and seemed deliberate.


My hubby helped me choose the wedding cake paper - it's textured and looks like frosting with a hint of metallic. Metallic ribbons encircle each tier and adds to the magical ambience.


When designing these patterns from scratch, I often made several versions because color combinations look different in my head than they do in real life. This green and teal version was one of the first. As you can see it's hard to keep a straight quilling strip when gluing such a long strip. I tried building the card from strips and using the teal to encircle the bottoms. Didn't make the cut for me.


Coral pinks/orange hues and chartreuse green have been popular wedding colors lately. I often challenge myself to use bolder color combos or ones that are not my personality. Cutting the cake shape seemed the best way to allow the quilling decor on top really come through unobstructed.


Sometimes I didn't have the right color ribbon to match my quilling strips (and didn't want to buy a whole spool), so I would use a felt marker to color a plain white ribbon.

So although the final pink and silver version is completely in my comfort zone palette, it's simply a classic to me. It also makes for a lovely congratulations card to the newlyweds because paper is traditionally given in the first year - how apt!

Pretty Quilled Cards is launching March 4, 2014 – less than 2 weeks away. Feels like I'm counting down to Christmas!

Feb 12, 2014

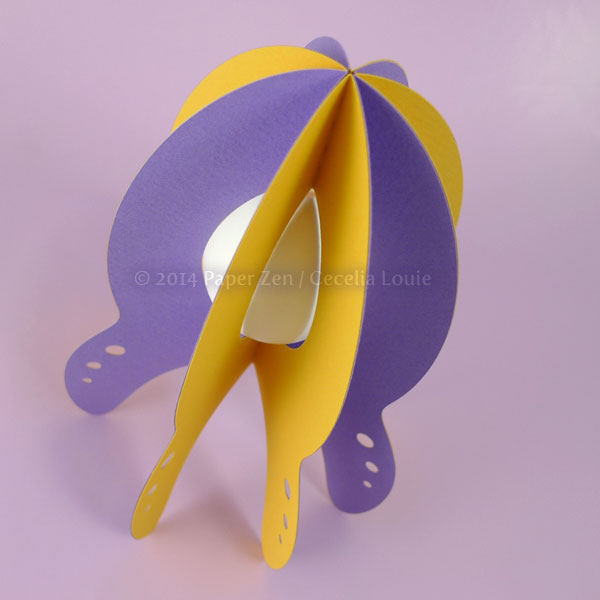
Easter Egg Spaceship


Last year I discovered Jeffery Rudell of Craft Stylish and was inspired to answer his challenge when I read his post, Oeuf Couture: How to Dress an Easter Egg. Easter had passed and I was focused on writing my book at the time, but it was always niggling my brain every few weeks. I know it's not Easter yet, but when you find the time to make something, you make it!


Jeffery's challenge was to make an egg "container" and allow the egg to be its natural color. I honestly love the egg spaceship in minimalist white as well as the final color version.


First, to blow out the contents of the egg, I made a hole in one end and inserted a syringe, then blew air into the egg until it was empty. This is such a contrast to the days when I would go blue in the face trying to blow it out with my mouth. After rinsing I also microwaved it for 10 seconds x 3 times, letting it cool in between sessions.


My favorite part of the spaceship is how the egg nestles so securely within, yet comes popping out when the spaceship is flattened. One thing I've learned is that not all eggs are the same shape! So if I break this one, I'd have to test all the eggs in a container to find another the right size.


I cut 4 yellow and 4 purples spaceships out of Canson Mi-Tientes paper with my Silhouette die cutter.


When gluing the folded halves, it helps to line them up on my table surface.


Ah, like an itch that finally got scratched, it feels so good to get this idea out of my head.

***UPDATE***: After receiving a request, this spaceship pattern is now in my store! Plus I had an extra brain storm. What if you wrote a message, rolled it up, and inserted it inside the egg? That special someone would need to crack the egg to read it! What fun!

Feb 7, 2014

Lark Book: Quilled Snowman

When I'm asked which is my favorite project in my book, Pretty Quilled Cards, I'm hard pressed to choose – but the snowman is a card I'll never be able to give away. I'm glad Lark put it on the back cover.

With this card, I added different materials such skewer sticks and thread. The scarf actually curls around his neck, and these have got to be hands down the easiest quilled snowflakes ever made. I think I simply love all the dimensions, whether it's the hole punched blush or his fingers when you view the card on an angle. Even his nose is diagonal, tilted just above the quilling strip.

During the writing, designing, and quilling process, I sometimes made cards several times over - a frustrating yet inevitable déjà vu process. This one I happened to nail the first time. Don't you love it when that happens? It's like the planets lined up!

Feb 6, 2014

Quilling Valentine Card – I Heart You Emoticon


For those who love to emoticon their thoughts, this is a quick and easy way to quill a letter for an easy Valentine card. I used the font Courier and typed it in the middle of a 4x4 inch card, turning the heart red. I used a skewer stick to round/rub the number 3's curves, then I had the perfect "guidelines" for gluing right on top.


Since there was so little paper edge to glue, I decided to use card stock rather than usual thinner quilling paper, otherwise I find it structurally weak. I have a pack that Michael's used to sell (haven't seen it for years in Canada now). I don't use it for quilling small coils or else it frays. So for this type of open lines, it's perfect. I think this is the fastest quilled card I've ever made :D

If you'd like to make it too, download the free PDF file here.

Feb 5, 2014

Free Mustache Valentine Card

I thought it would be fun to swap out the standard "I heart U" with a mustache icon. The die cut heart edges are rubbed with an ink pad to give it more definition. The larger 5x7 size is all printed, and the 4x6 size is actually a quilled mustache.

When they open it, the message is complete.


To make the quilled mustache, I used a 6" strip and made a teardrop, then curled the tapered portion.

If you'd like to print your own, please leave your email in a comment and I'll email you the file until Valentine's Day, Feb 14, 2014. There will be 4 pages in the PDF file - 2 sizes and 2 versions whether you'd like to print and/or quill the mustache. Hope you have fun with it!

Cecelia